

Snowflakes are rare where we live in Arizona. Thus, we make sure to educate our young students on how winters look in states with four seasons and other places worldwide.
Wintertime is a perfect time to create beautiful and unique snowflakes arts and crafts with children. The 10 snowflakes ideas below are fun and easy. Most of the supplies you will find around your house, or a quick trip to a dollar store might be worthwhile to create your charming snowflakes. Boost creativity and fine motor skills and design a snowflake today!
Coffee Filter Snowflakes
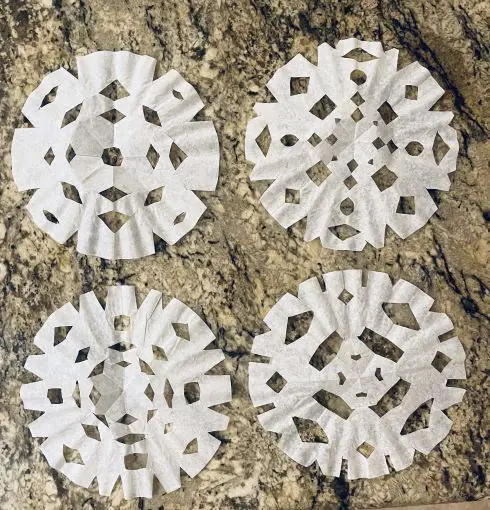
Supplies: round coffee filters and scissors
Instructions:
- Fold the coffee filter in half, fold again, and fold one more time, so it looks like a pizza slice.
- Make sure it is nice and flat.
- Start cutting out different shapes around the sides of the folded coffee filter.
- Make sure children cut a triangle, circle, square, rectangle, and snip the paper’s sides.
- Cut different shapes around three sides of the folded paper.
- When done, unfold to discover a unique snowflake.
Tip: If you do not have round coffee filters, kids can use white paper, precut into circles, and follow the process of folding and cutting. Coffee Filters.
Lacy Snowflakes
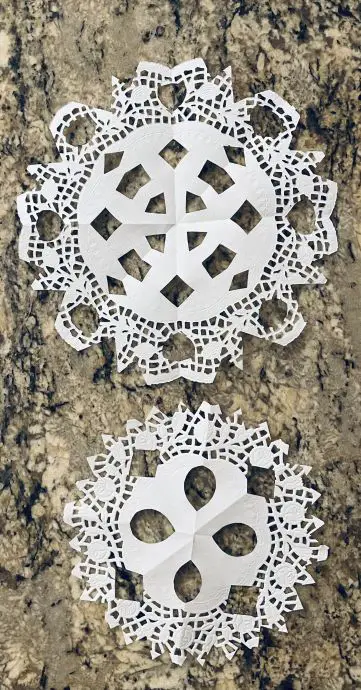
Supplies: doilies and scissors (I bought a pack of 32 doilies in a dollar store).
Instructions: The instructions are the same for the coffee filter snowflakes above, as dollies are round and lacy. Make sure you separate doilies as they are thin and easily stick together. Additionally, it is trickier for kids to cut shapes using laced paper.
Tip: Water paint snowflakes to add an icy effect. Doilies Laced Paper.
Edible Snowflakes

Supplies: mini marshmallows, medium/large marshmallows, pretzel sticks, cheerios, and toothpicks/wooden craft sticks.
Instructions: Compose your intricate snowflake design and eat it after if you wish.
Crystal Snowflake
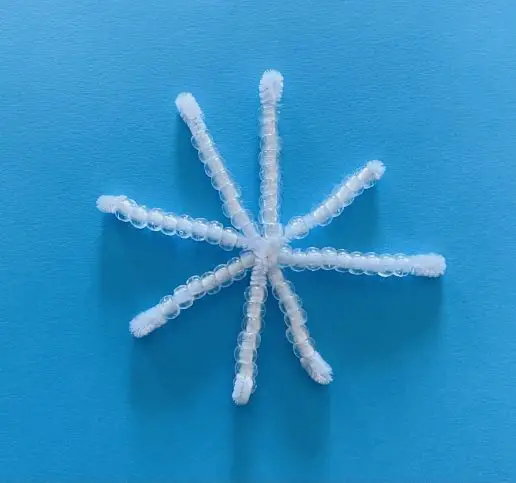
Supplies: white pipe cleaners and small clear beads.
Instructions:
- Cut 3 or 4 white pipe cleaners in half depending how many sides you want, 6 or 8 (I read that all snowflakes have six sides, but for children’s craft purposes, we do not follow this rule).
- Twist pipe cleaners in the middle to create a star—lace beads on the pipe cleaners.
- Bend the tip at the end to prevent bead sliding.
Tip: Clear beads and White Pipe cleaners.
Paper Snowflakes
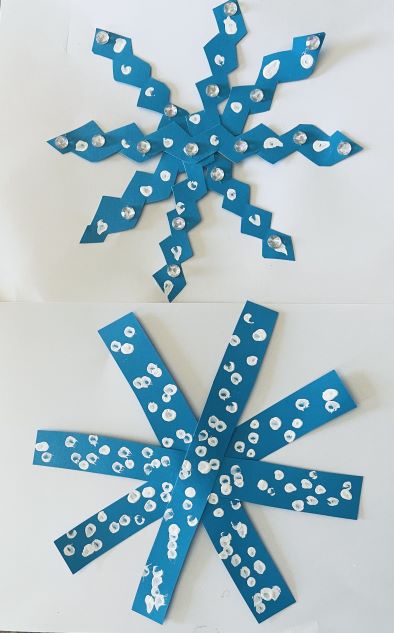
Supplies: blue paper, scissors, glue, q-tip, white paint, and optional glitter and stickers.
Instructions:
- Draw 3 or 4 vertical lines on the piece of paper, about 1 inch apart.
- Cut across the lines until you have 3 or 4 paper strips.
- Arrange a plus sign with two paper strips and glue it in the middle. Add a third and fourth line to make a start and glue paper strips in the middle.
- Now you have created a snowflake.
- Dip q-tip in white paint and decorate your snowflake with snow. Add glitter on top if you desire.
Tip: Cut sides of the paper strips to create unique designs and practice additional scissor skills. Create pointy ends and add patterns to the sides. Attach snowflakes to the window or glue them to the white paper. Dip pointer finger in the paint if you don’t have access to q-tips. White paint and Rhinestone Stickers.
Storm of Snowflakes

Supplies: dark paper and white marker, chalk, or crayon.
Instructions:
- Practice drawing various snowflake designs and sizes. Children need to draw vertical lines, horizontal lines, diagonal lines, and combine lines to create a snowflake.
- Teach children first to draw a plus and then add long diagonal lines through the middle. If this is hard, then we work on drawing short diagonal lines to meet the center.
- Decorate your snowflake with additional line designs on the arms of the snowflake, add detail, and let kids draw their snowflake designs.
Tip. For teachers and therapists teaching virtually on zoom, use the whiteboard to demonstrate a step-by-step snowflake drawing. White Markers, White Crayons, and White Pencils.
Puffy Snowflakes

Supplies: q-tips, mini marshmallows, and medium/large marshmallows.
Instructions:
- Cut some q-tips in half.
- Place a big marshmallow in the middle.
- Insert long and short q-tips into the larger marshmallow. Place mini marshmallows on q-tips to make your snowflake design.
- Place mini marshmallows on q-tips and then insert them onto the center marshmallow if you prefer.
Shiny Snowflake
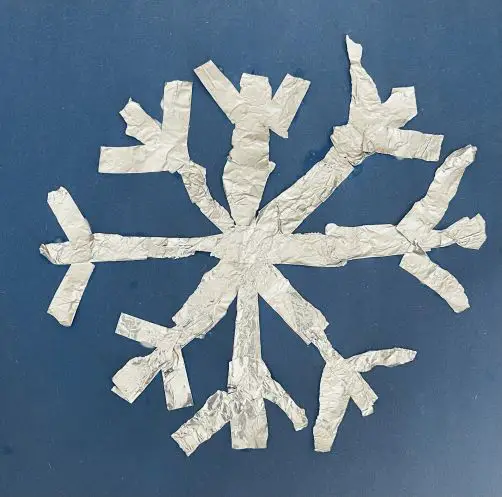
Supplies: template with a snowflake, or pre-draw a snowflake on paper, glue, and aluminum foil strips.
Instructions: Rip small pieces of aluminum foil and glue them onto the snowflake.
Tip. Crumple white tissue paper instead of aluminum foil.
Hand Print Snowflake
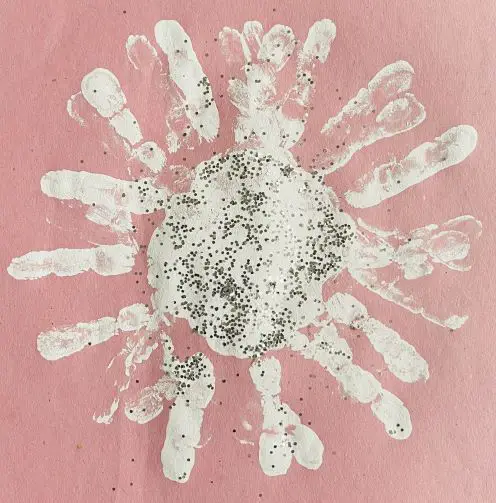
Supplies: white finger paint, paintbrush, paper, and glitter optional.
Instruction: Apply white paint on hand with paintbrush, press hand on paper, repeat around to create a snowflake with handprints. Sprinkle glitter on top if desired.
Toilet Roll Snowflakes

Supplies: recycled toilet paper roll, white paint, and paper.
Instructions: Create two creases on the toilet paper roll Dip the paper roll in white paint and create a snowflake design. Children can copy a specific snowflake design or create their own.
If you need a movement break during snowflake making process, enjoy a snowflakes song and dance.
Conclusion
Creating art provides children with an opportunity to express themselves to improve fine motor skills and have fun. Let the snowflakes’ creations begin!
If you enjoyed this article, please share it with a friend!
You might also enjoy
Fun and Easy Igloo Art for Children
10 Christmas Tree Art Ideas for Kids
How to make Holiday Frosting Playdough
Fun Animal Walk Exercises for Children
Is My Child Ready to Write Letters?
10 Activities to Improve Hand Strength in Children
*Kids Groove and Grow is a participant in the Amazon Services LLC Associates Program, as an affiliate advertising program designated to provide means for sites to earn advertising fees by advertising and linking to Amazon.com.
0 Comments